
East Main Entrance Automatic Door Lock
Using Luna Access Control
Foothills Unitarian Church | For all staff | Updated June 2026
|
Vendor dormakaba Customer Support: 866-367-6252 https://www.dormakaba.com/us-en
Account Details Foothills Church Access Control Account #: 231644 Serial #: JBL4914 Installed: March 2024 |
Local Sales Rep Spencer Lee, Inside Account Manager Phone: (303) 698-1898 Direct: (303) 539-5258 Mobile: (720) 641-2271 Fax: (303) 698-2094 Email: spencer.lee@imlss.com Web: www.imlss.com GSA: GS-07F-0239W 999 South Jason Street, Denver, CO 80223 |
|
⚠ Important: Luna must be run on the Dell laptop on Holly’s desk. All passwords are stored in Dashlane. |
|
Step-by-step instructions
Step 1 – Log in to Luna
Luna is a desktop application made by dormakaba. To open it, double-click the Luna icon on your computer. The login screen will appear with a single Password field. Enter your password and press the key icon (or Enter) to log in.
|
|
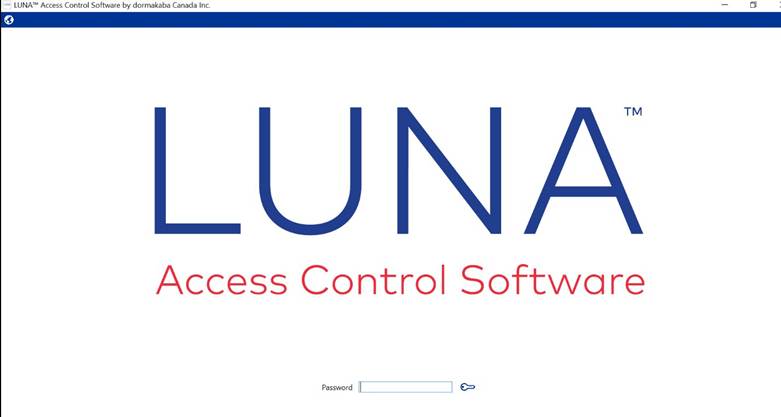
1. Double-click the Luna Access Control icon on your desktop to open the application.
2. The Luna login screen will appear, showing a large LUNA logo and a Password field at the bottom.
3. Type your password in the Password field.
4. Type your password in the Password field.
5. Click the key icon to the right of the password field, or press Enter, to log in.
|
⚠ Note: If you do not know your password, contact your system administrator. Do not share your password with others. |
Step 2 – Unlock a door or grant access
You can unlock a door directly from the Luna main screen. This is useful when someone needs access and their card is not working, or for temporarily opening a door for an event.
|
|

6. After logging in, you will see the Luna main screen with a small upward arrow (^) at the bottom center. Click that arrow to expand the door panel view.
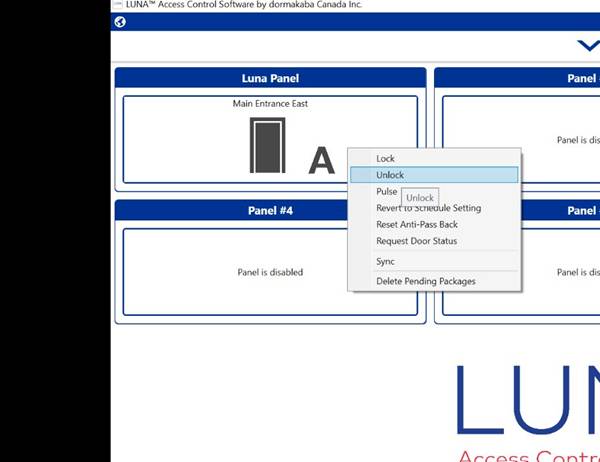
7. The door panels will appear, showing doors such as Main Entrance East. Each panel displays a door icon and its current status.
8. Right-click on the door you want to unlock (e.g., Main Entrance East). A menu will appear with options including Lock, Unlock, Pulse, and others.
9. Click Unlock from the menu. A confirmation prompt may appear — click Unlock again to confirm.
10. The door panel’s grey area will turn green to confirm the door is now unlocked. To re-lock, right-click the door and select Lock.
|
⚠ Note: Always re-lock the door when you are done by right-clicking and selecting Lock. A green panel means the door is currently unlocked. |
Step 3 – Add or remove a user or access card
Anyone who needs building access must be added as a person in Luna and assigned a fob or access card. Access fobs are kept in the top desk drawer in the office. When someone leaves, their access should be removed promptly.
To add a new person:
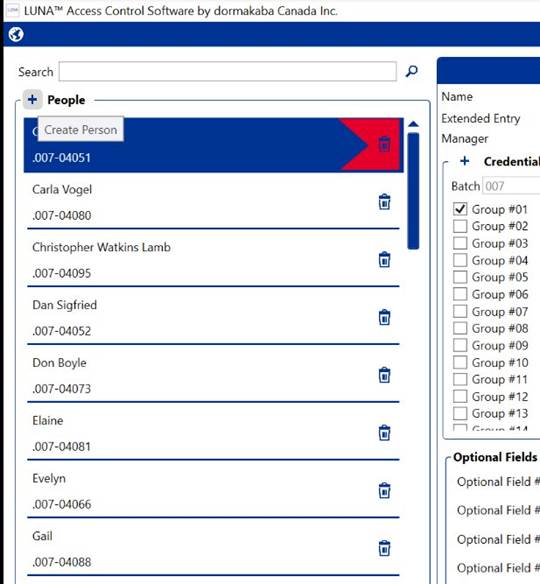
11. Click the three horizontal bars (☰) in the top left corner to open the navigation menu, then select People.
12. Click the + next to People at the top of the list. A blank form will appear on the right side of the screen.
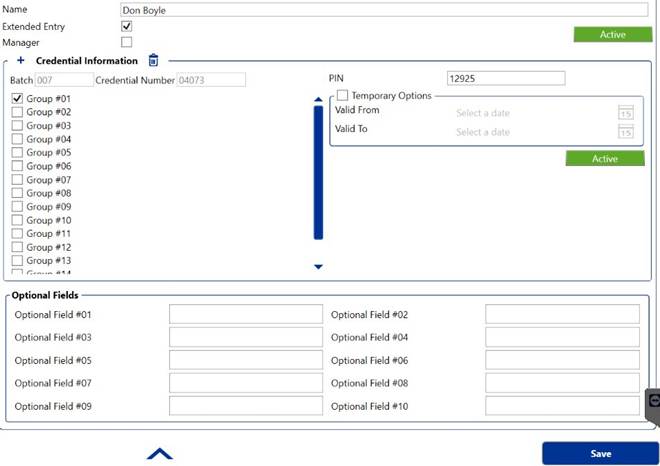
13. Type the person’s name in the Name field.
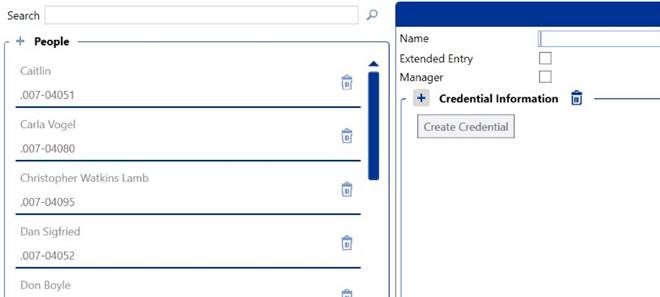
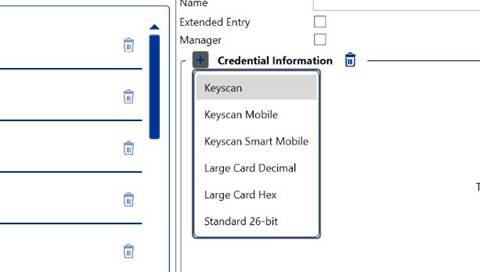
14. Under Credential Information, click the + button. A dropdown will appear — select Keyscan.
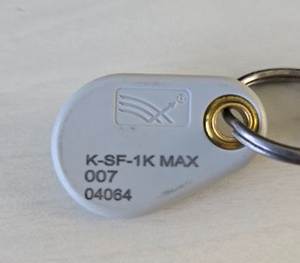
15. Enter the credential number from the fob. Get a fob from the top desk drawer. The Batch number is always 007. The credential number is the second number on the back of the fob (e.g., 04064).
16. Check the box for Group #01 to grant standard building access. Then click Save (or press Enter) to activate their access.
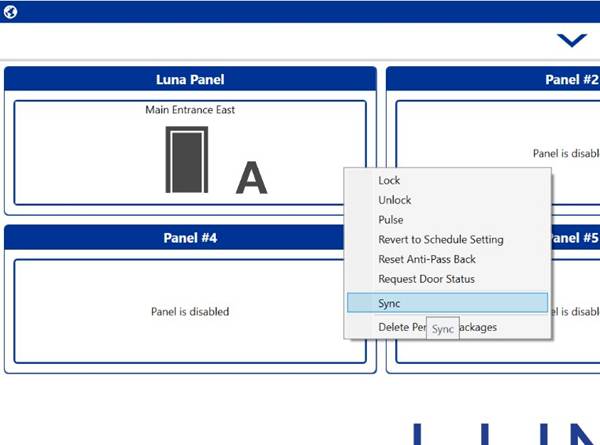
17. Important: After saving, the fob will not work until you sync the panel. Click the arrow (^) at the bottom center of the screen, then right-click on Main Entrance East and select Sync. Wait for the confirmation before handing the fob to the person.
To remove a person:
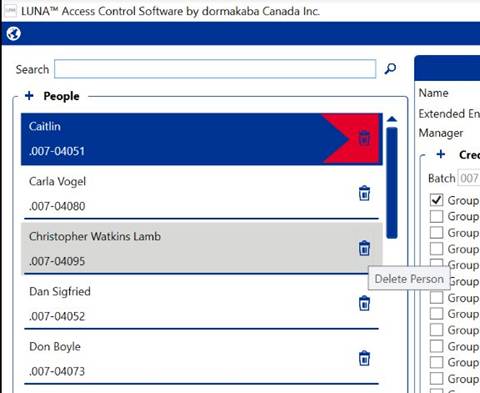
18. Click the three horizontal bars (☰) in the top left corner, then select People.
19. Find the person in the list. You can type their name in the Search bar at the top to locate them quickly.
20. Click the trash can icon (🗑) next to their name. Confirm the deletion when prompted. Collect the fob from the person and return it to the desk drawer.
21. Go back to the arrow (^) at the bottom center, right-click Main Entrance East, and select Sync. The fob will not be deactivated until the sync is complete.
Step 4 – View access logs and reports
Luna keeps a record of every door event — who used their fob, when, and whether access was granted or denied. You can run a Transaction Report at any time to review this history.
|
|
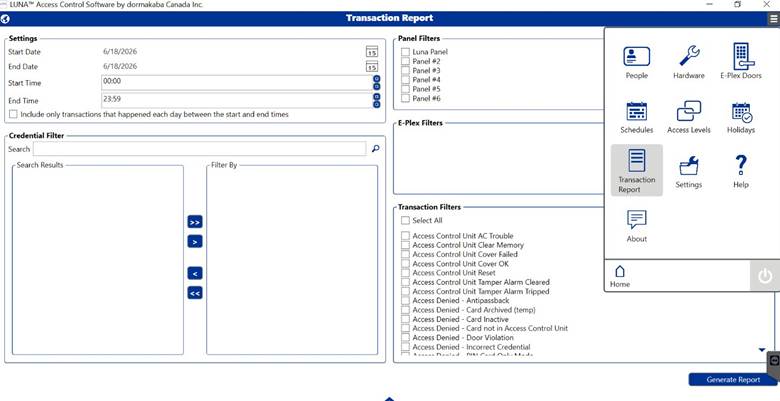
22. Click the three horizontal bars (☰) in the top left corner to open the navigation menu, then click Transaction Report.
23. Set the Start Date and End Date under Settings. The dates default to today. Click the calendar icon next to each date to change them.
24. Optionally narrow your results: use the Credential Filter search box to look up a specific person, or check boxes under Panel Filters to focus on a specific door. You can also check specific event types under Transaction Filters (e.g., Access Denied events only).
25. Click Generate Report (bottom right corner). The report will display each transaction showing the person’s name, door, time, and whether access was granted or denied.
26. To export the results, look for a print or export option within the report view. The report can be saved or printed for your records.
|
⚠ Note: Transaction Reports are useful for security reviews and troubleshooting. If you see repeated Access Denied entries for a person, check that their credential was entered correctly and that Sync was run after saving. |
Step 5 – Configure the access schedule
The schedule controls when doors automatically unlock and lock on a timer — for example, unlocking the main entrance at 7:00 AM on Sundays and locking it again at 12:30 PM. This is separate from fob access; fobs work at any time regardless of the schedule. Luna supports one schedule (Weekly Schedule). Times are entered in 24-hour format — for example, 18:00 means 6:00 PM.
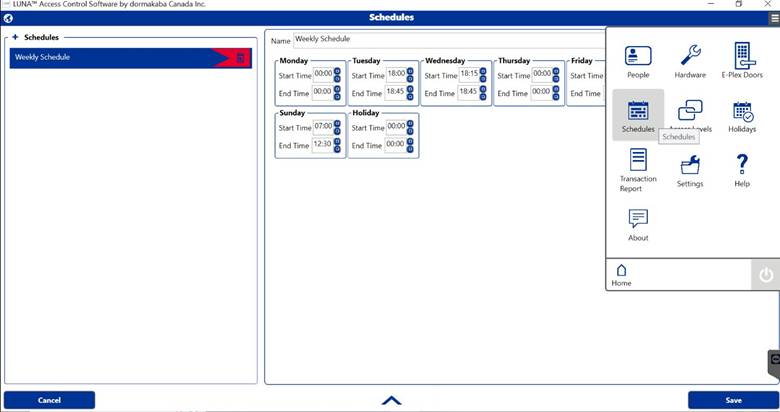
27. Click the three horizontal bars (☰) in the top left corner to open the navigation menu, then click Schedules.
28. Click Weekly Schedule in the left panel to open it.
29. For each day, click into the Start Time and End Time fields and type the times you want using 24-hour format. The Start Time is when the door will automatically unlock; the End Time is when it will automatically lock again. For example, enter 07:00 for 7:00 AM and 12:30 for 12:30 PM. Leave both times as 00:00 on days when no automatic unlock is needed.
30. Click Save at the bottom right when finished.
31. Go back to the arrow (^) at the bottom center, right-click Main Entrance East, and select Sync. The new schedule will not take effect until the sync is complete.
Troubleshooting
|
Problem |
Fix |
|
I cannot log in |
Check that Caps Lock is off. If you have forgotten your password, contact your system administrator to have it reset. |
|
The Unlock button is grayed out |
You may not have permission to control that door. Contact your administrator to verify your user role. |
|
A card is not granting access |
Open the People list, find the person, and confirm their credential is saved correctly with Group #01 checked and batch/credential numbers matching their fob. Also make sure you right-clicked Main Entrance East and selected Sync after saving — the fob will not work until this is done. |
|
A door is stuck in Hold Open |
Go to the door's detail page and click Lock or End Hold Open to restore normal operation. |
|
No events are showing in the log |
Check that the Start Date and End Date are set correctly in the Transaction Report. Try widening the date range and removing any Credential or Panel filters, then click Generate Report again. |
|
I accidentally deleted a cardholder |
Deleted records cannot be restored. You will need to re-add the person under People, re-enter their credential, check Group #01, save, and Sync the panel again. |
|
Luna is loading slowly or not responding |
Restart the Luna application. If the issue persists, check your computer’s network connection or contact your IT administrator. |
|
Schedule change is not taking effect |
After saving the schedule, you must right-click Main Entrance East and select Sync. Changes do not take effect until the panel is synced. |
|
Luna cannot connect / system not responding |
See the detailed connectivity steps below. |
Connectivity troubleshooting
Normal operation (remote connection)
Luna connects to the access control equipment via the wireless IP address 192.168.50.216. The Dell laptop must be connected to the CourageousLove-Tech wireless network. The laptop should already be connected to this network under normal circumstances.
If Luna cannot connect remotely — local access via XpicoWiFi
If the remote connection fails, you can connect directly to the equipment using the local network:
● On the Dell laptop, connect to the Wi-Fi network XpicoWiFi_D58F13.
● Connect to the local equipment at IP address 192.168.0.1. The username and password are stored in Dashlane.
If XpicoWiFi_D58F13 is not visible — reboot the Wi-Fi box in the attic
If the XpicoWiFi network does not appear in the Wi-Fi list, the Luna Wi-Fi box in the attic needs to be rebooted:
● Go to the attic above the kitchen.
● On the northeast wall, locate two boxes: a black Wi-Fi box labeled “Luna” and a beige box labeled “Best.” There is also a power outlet near the beige Best box.
● On the black Luna box, unplug the black block at the bottom to cut power, wait a few seconds, then plug it back in to reboot. Wait for the XpicoWiFi_D58F13 network to reappear before proceeding.
FAQs
Who should have access to Luna?
Anyone who needs to manage building access — typically office staff, facilities staff, and designated administrators. Regular volunteers or building users do not need Luna accounts; they just need an access card.
What access group should I assign to a new cardholder?
For standard building access, check Group #01. This covers the main entrances and general areas. If you are unsure whether additional groups are needed, check with your administrator.
Can I unlock a door from my phone?
Yes, if your administrator has set up the Luna mobile app. Log in with the same password and use the Doors screen to unlock remotely.
How do I find a card number to add as a credential?
Get a fob from the top desk drawer. Flip it over — you will see two numbers. The first line (007) is the Batch number, which is always 007 for our fobs. The second number (e.g., 04064) is the credential number to enter in Luna.
What happens when I deactivate a cardholder vs. delete them?
Clicking the trash can permanently deletes the person and their access history from Luna. Make sure to collect their fob before or immediately after deleting, and always Sync the panel afterward so the fob stops working right away.
How long are access logs kept?
Transaction Report history depends on your Luna system settings, typically configured by your administrator. If you need to pull records from further back than what’s available, check with your administrator.
Can I set different automatic unlock times for different days?
Yes — the Weekly Schedule lets you set different automatic unlock and lock times for each day of the week, including Sunday and Holidays. Leave both times as 00:00 on any day when no automatic unlocking is needed.
Can I add a second schedule for a special event?
No — Luna supports only one schedule. For a one-off automatic unlock (such as a special event), temporarily update the schedule times for that day, then restore them afterward. Remember to Sync after any change.
No comments to display
No comments to display