# General How Tos

# Scheduling an Event

Event Scheduling Procedures for Staff, Group Leaders and Rentals

# How To: Group Leaders to Request Facility Use For Regular Meetings (Non-Promotional Events)

This procedure is designed for group leaders at Foothills Unitarian Church who need to request the use of church facilities for regular meetings that do not require promotion beyond current members.

<p class="callout info">Example: Members of the Solar Team want to have a regular meeting of their team that doesn't require any church wide communication. </p>

#### Step 1: Create Event in PCO Group

<table border="1" id="bkmrk-access-group%27s-event" style="border-collapse: collapse; width: 107.037%;"><colgroup><col style="width: 47.7161%;"></col><col style="width: 52.4075%;"></col></colgroup><tbody><tr><td>- **Access Group's Events Tab:** Navigate to your group's Events tab in Planning Center Online (PCO) Groups.
- **Select "Create a New Event":** Click on the option to create a new event.

</td><td>![create a new event_arrow.png](https://pcogroups.zendesk.com/hc/article_attachments/23575205963163)</td></tr><tr><td>- **Input Event Details:**
    - **Event Name and Description:** Provide a clear name and description for the event. This information will be visible in Church Center for your group.
    - **Meeting Time:** Set the date and time for the event. If it's a one-time event, set "Repeat" to "Never." For recurring events, select the appropriate frequency and end date.
    - **Location:** Choose the location where your event will take place.
    - **Automated Reminders:** Set up any necessary reminders for the event.
- **Create Event:** Once all details are filled in, select "Create event" to add it to your group's calendar.

</td><td>![event settings_numbered.jpeg](https://pcogroups.zendesk.com/hc/article_attachments/23575218748315)</td></tr></tbody></table>

#### Step 2: Add to Calendar

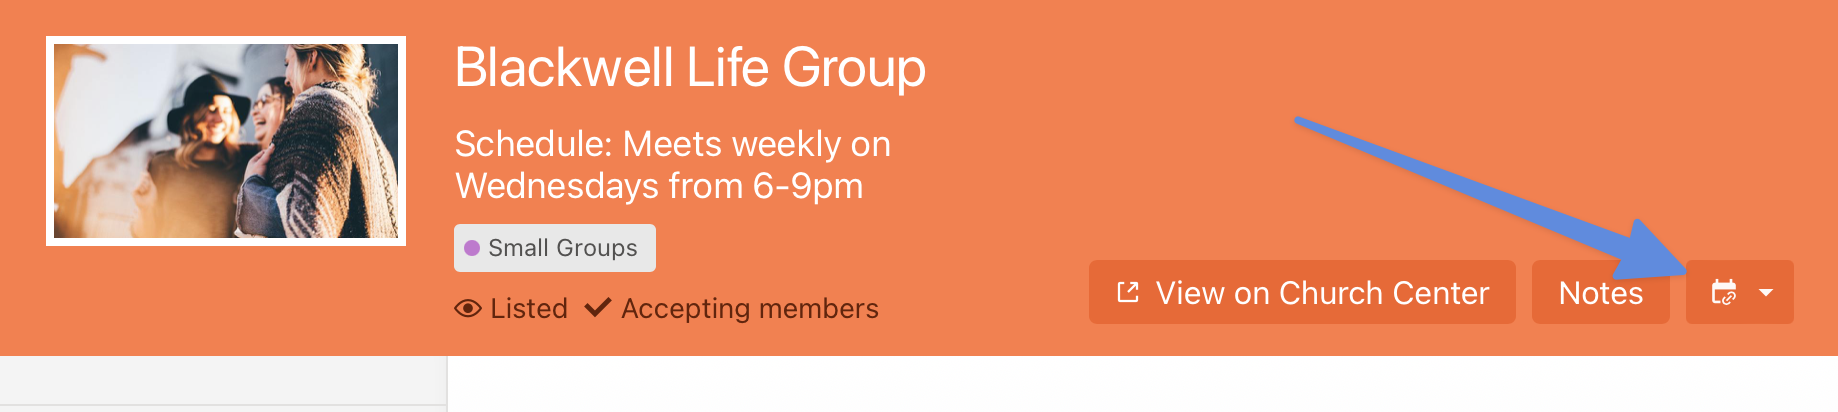
<table border="1" id="bkmrk-select-calendar-icon" style="border-collapse: collapse; width: 100%;"><colgroup><col style="width: 50%;"></col><col style="width: 50%;"></col></colgroup><tbody><tr><td>- **Select Calendar Icon:** From the group event page, click on the calendar icon.

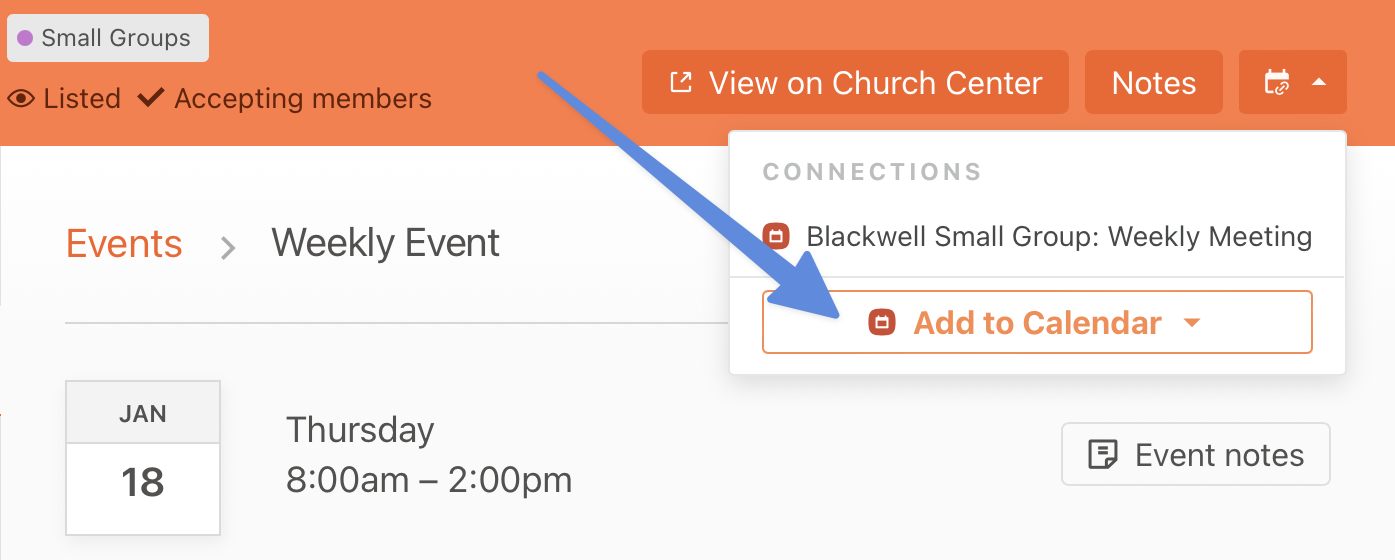
</td><td>![connections dropdown_arrow](https://pcogroups.zendesk.com/hc/article_attachments/23151049508379)</td></tr><tr><td>- **Choose "Add to Calendar":** This will direct you to an event request form in Church Center.

</td><td>![add to calendar_arrow.png](https://pcogroups.zendesk.com/hc/article_attachments/23151028122907)</td></tr><tr><td> </td><td>  
</td></tr></tbody></table>

#### Step 3: Fill Out Form

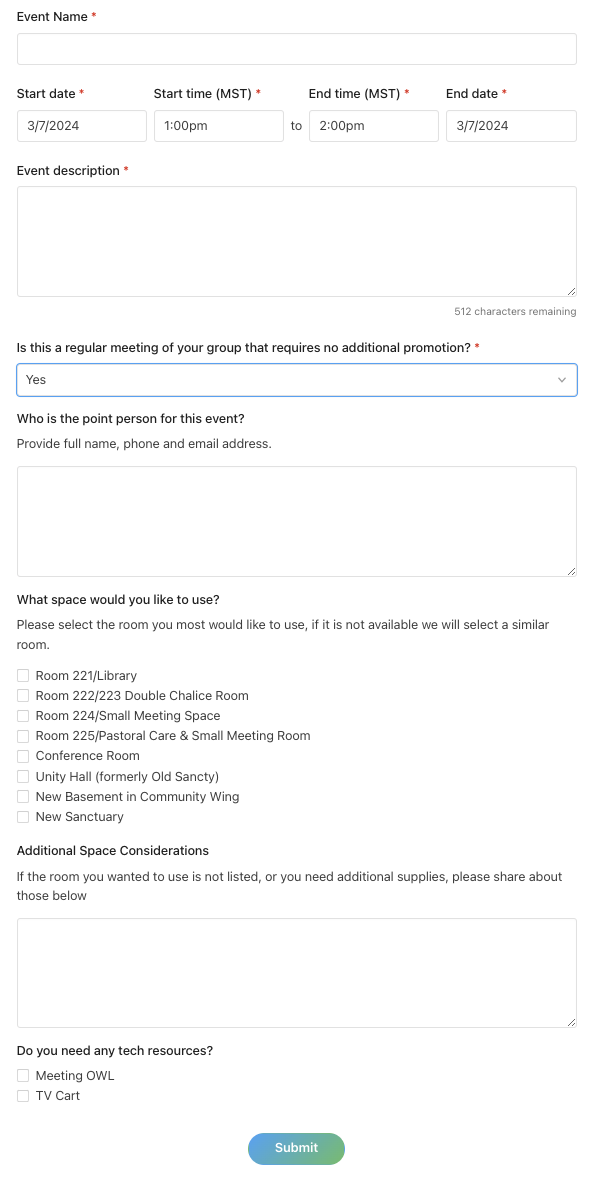
<table border="1" id="bkmrk-complete-request-for" style="border-collapse: collapse; width: 100%;"><colgroup><col style="width: 50%;"></col><col style="width: 50%;"></col></colgroup><tbody><tr><td>- **Complete Request Form:** Fill out the form with any additional notes and information required for your event.
- **Submit for Review:** After completing the form, submit your request for approval.
- 

</td><td>[![Screenshot 2024-03-07 at 12.08.17 PM.png](https://211134-bookstack.peaknetworks.cloud/uploads/images/gallery/2024-03/scaled-1680-/WG3zVP3gQ01YQkDW-screenshot-2024-03-07-at-12-08-17-pm.png)](https://211134-bookstack.peaknetworks.cloud/uploads/images/gallery/2024-03/WG3zVP3gQ01YQkDW-screenshot-2024-03-07-at-12-08-17-pm.png)</td></tr></tbody></table>

#### Step 4: Receive Confirmation

- **Await Notification:** Keep an eye on your email for responses regarding your request. This may include further questions, approval, or rejection.
- **Confirmation Email:** Once approved, you will receive a confirmation email. This email may contain a customizable note with further instructions or information.

<p class="callout warning">**Event Editing:** While events in your group can be updated post-creation to update information (add location once confirmed, or update description). **These changes will not update any facility usage information**. Please contact the Admin Team directly for any changes in your facilities use request. </p>

# How To: Schedule a"Church Wide" Events (Facility Use and Promotion)

Church-wide events are significant occasions aimed at engaging the broader congregation beyond specific groups or team members. These events require careful planning, approval, and promotion to ensure they reach and resonate with the entire church community. Below is a step-by-step procedure for staff and group leaders to request facility use and promotion for church-wide events.

#### Step 1: Obtain Event Approval

- **Verify Approval:** Ensure the event has been approved by the staff lead of your group. Approval can be direct from staff lead or as part of your group/team’s annual Shared Ministry Covenanting process, indicating the event's inclusion in the year’s plan.
- **Consult Church Calendar**: Foothills is a larger church with a busy campus. Before you seek event approval it might be wise to consult our calendar or call the office to find the right date for your event.   
    
    - For Group Leaders, consult: [https://foothillsuu.churchcenter.com/calendar?view=month](https://foothillsuu.churchcenter.com/calendar?view=month)
    - For Staff, consult [https://calendar.planningcenteronline.com/](https://calendar.planningcenteronline.com/)

#### Step 2: Submit Event Request

- **Access the Form:** Use the provided link ([FoothillsUU Church Center Calendar Form](https://foothillsuu.churchcenter.com/calendar/forms/11539)) to access the event submission form. ([Admin Link](https://calendar.planningcenteronline.com/forms/11539/requests))
- **Fill Out the Form:** Complete all sections of the form, providing detailed information about your event. The form will cover: 
    - **Event Permission and Details:** Confirm staff lead approval, identify the hosting group/team, specify if the event recurs, detail A/V and hospitality needs.
    - **Promotion and Communication:** Offer a compelling pitch and a concise description for promotional purposes, and upload any existing promotional materials.
    - **Event Logistics:** Include the event coordinator(s)’ contact information, specify if food will be served, and describe the space requirements for the event.

##### Step 2A: Promotion and Communication

- **Compelling Pitch:** Craft a one-sentence pitch that highlights the value or experience attendees will gain from the event.
- **Event Description:** Provide a brief (25-50 words) yet engaging description of the event for use in promotional materials.
- **Promotional Materials:** Upload any pre-existing promotional images or materials. Note that materials may be adjusted to align with the church’s brand standards.

##### Step 2B: Event Logistics

- **Coordinator Information:** List the event coordinator(s) and their contact details, specifying roles if multiple people are involved (e.g., registration, setup, day-of activities).
- **Select a Event Template**: Consult our [list of Event Templates](https://211134-bookstack.peaknetworks.cloud/books/church-events/page/event-templates) and select which setup best fits your needs.
- **Food (including set up and clean up plan)**

##### Step 2C: Review and Submission

- **Review Your Submission:** Before submitting, review all provided information for accuracy and completeness.
- **Submit the Form:** Once all details are verified, submit the form for processing. Your request will be reviewed by the events team or relevant administrators.

#### Step 3: Confirmation and Follow-Up

- **Wait for Confirmation:** After submission, await confirmation and any follow-up communication from the church’s staff. They may contact you with follow up questions.
- **Promotion:** Upon approval, the church’s communication team will begin promoting the event to the congregation according to the event’s prominence and the overall communication strategy.

# How To: Staff Facility Use (Non-Promotional Events)

For staff-organized events such as team meetings or group discussions that do not require promotion, the following procedure should be followed to ensure the event is properly scheduled and resources are allocated without being visible to the wider congregation. This ensures efficient use of our facilities while maintaining privacy and focus for internal activities.

#### Step 1: Accessing the Calendar

- Navigate to [Calendar](https://calendar.planningcenteronline.com/).   
    
    - If you do not have the necessary permissions to create an even please contact the Admin Team.
- View the day you are looking to book and see what other events are on the Calendar to make sure you can request an open space.

#### Step 2: Creating the Event

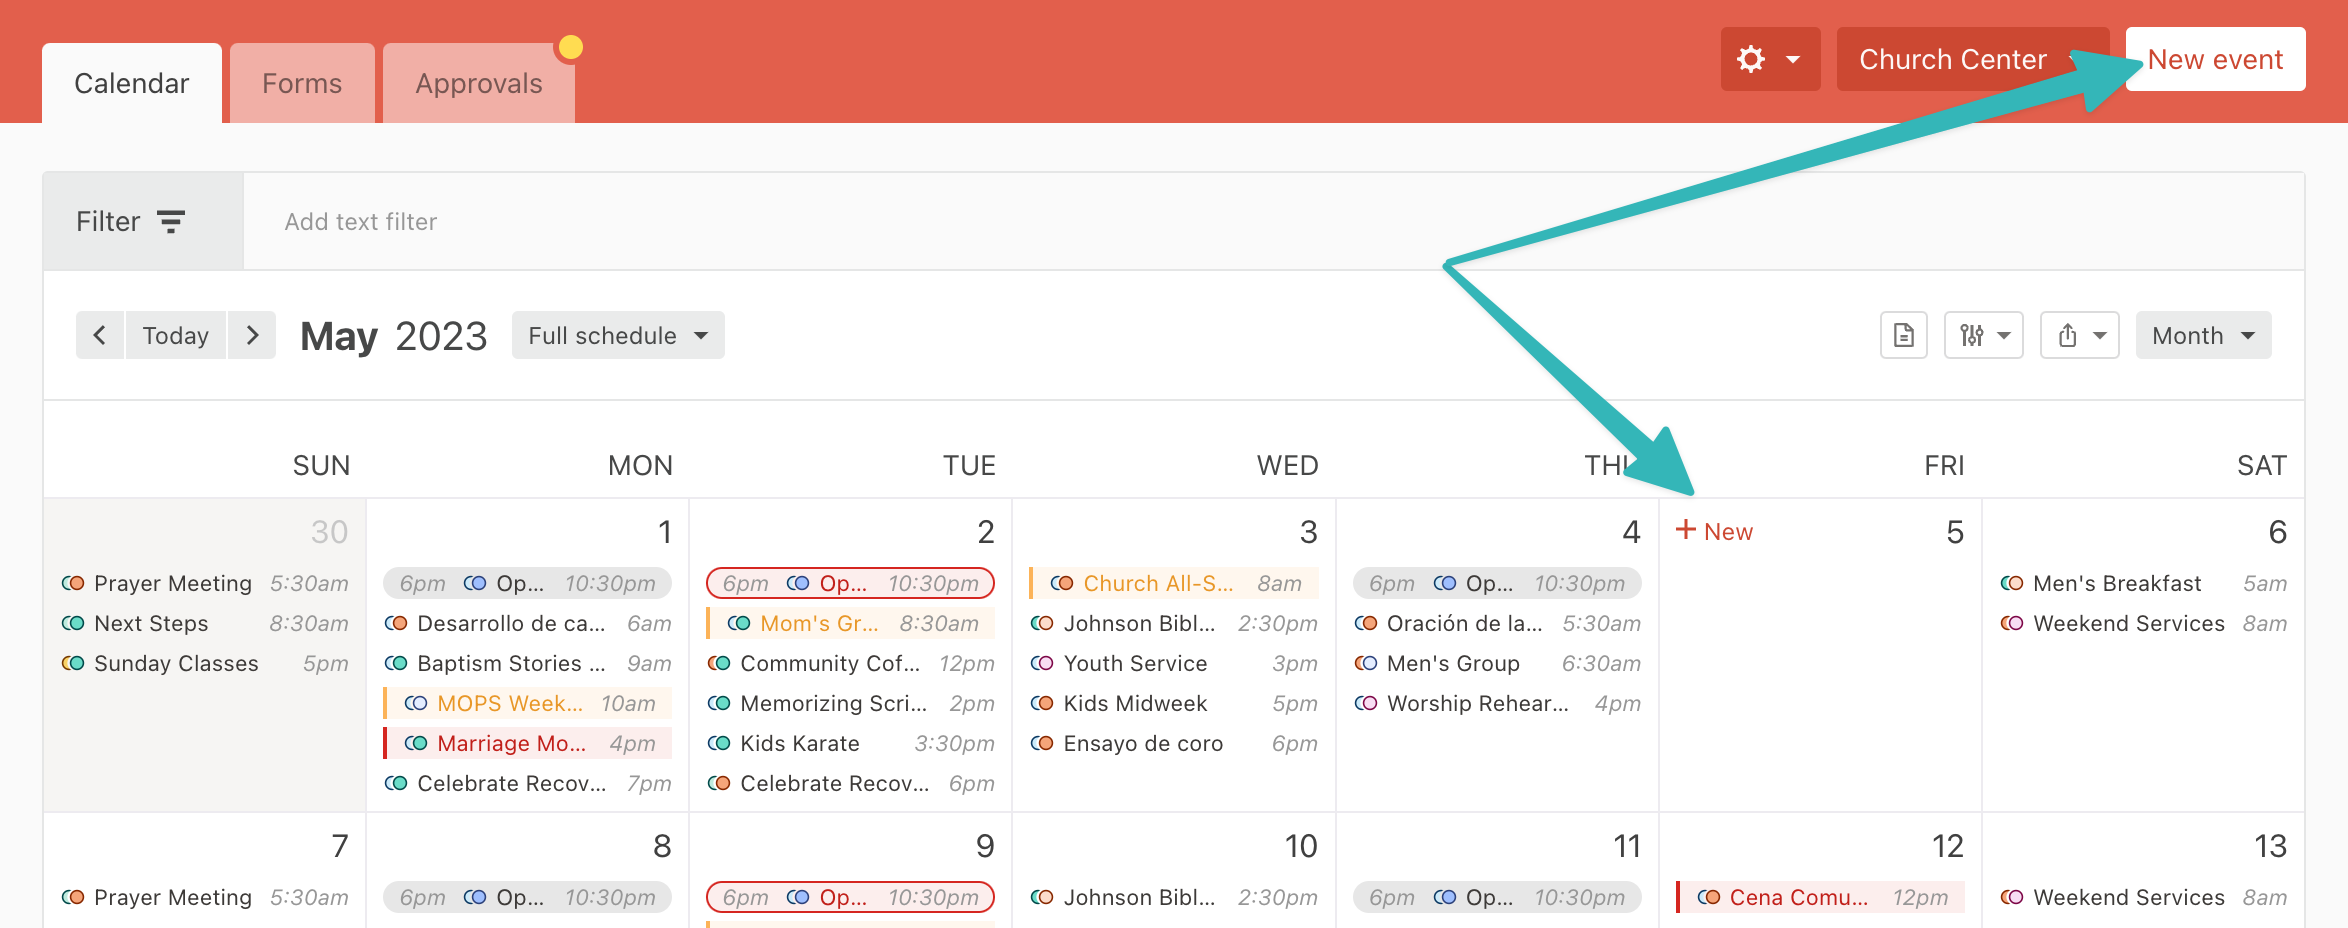
<div class="mediaobject" id="bkmrk-1.-from-the-events-p"><table border="1" style="border-collapse: collapse; width: 100%; height: 607.937px;"><colgroup><col style="width: 44.1565%;"></col><col style="width: 55.8435%;"></col></colgroup><tbody><tr><td>1\. **From the Events page, select <span class="emphasis">*New Event*</span> or hover over the date and select <span class="emphasis">*New*</span> to create an event.**

</td><td>[![new_event_arrows.png](https://pcocalendar.zendesk.com/hc/article_attachments/21173802521755/uuid-ec521183-e3b5-5f93-3224-438016b52409.png)](https://pcocalendar.zendesk.com/hc/article_attachments/21173802521755/uuid-ec521183-e3b5-5f93-3224-438016b52409.png)

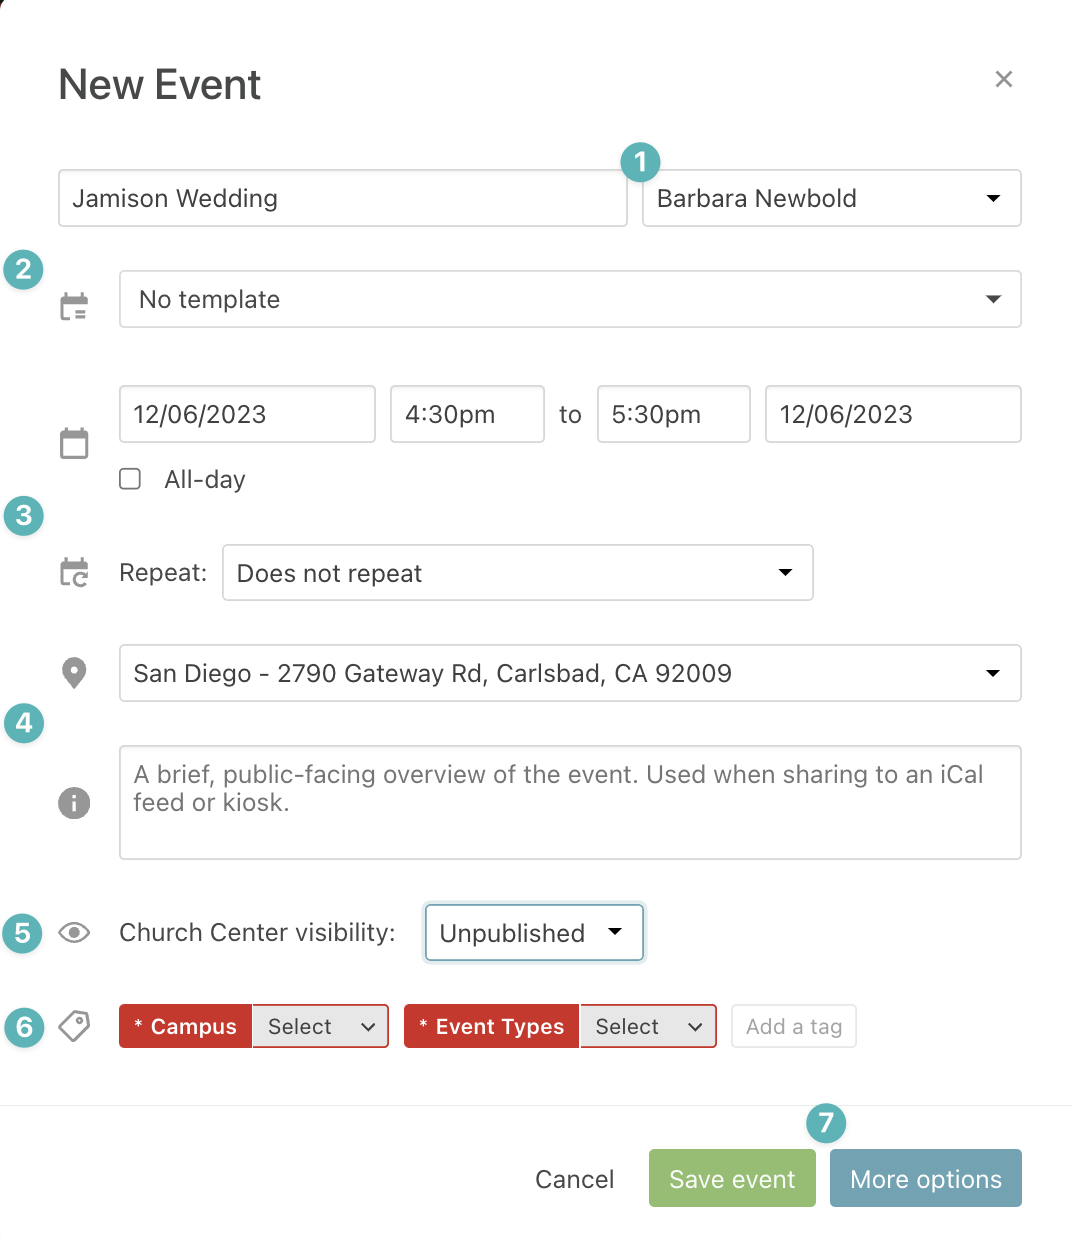
</td></tr><tr style="height: 401.359px;"><td style="height: 401.359px;">2\. **Compete the Event Information and click more options**

<p class="callout warning">There are more fields required for an event than on this set up section. Consult the[ Required Event Entry Section](https://211134-bookstack.peaknetworks.cloud/books/church-events/page/event-requirements) for the full list. </p>

</td><td>![modal_new event_numbered.png](https://pcocalendar.zendesk.com/hc/article_attachments/21173834082843/uuid-6696bfd0-7fd2-2cf2-268e-2822b00044dd.png)

</td></tr><tr><td>3\. **Add Rooms and Resources on the Overview Page**

- Add the setup and teardown schedule as well as any other times you might need to reserve for the event.
- Search or browse for rooms and resources, expanding to answer any required questions and specifying the room setup.
- Remember to hit 'Save Changes to this Date"

</td><td></td></tr><tr><td>4\. **Navigate to the Settings Page**

Complete the Summary, Notes, and ChurchCenter information (if the event is visible).

</td><td></td></tr></tbody></table>

</div>#### Step 3: Wait for Approval 

The [Facilities Approval Group](https://211134-bookstack.peaknetworks.cloud/books/church-events/page/facility-use-approval-process), will receive your request and you will receive an email with your events approval.

<p class="callout warning">If there is missing information from your request, the Admin team will ask you to complete the information before approving your request. </p>

# Tips: Getting the Word Out About Your Event

1. Schedule the event in your PCO group. Instruction on how to schedule a PCO group can be found [here](https://scribehow.com/shared/Creating_a_PCO_Group_Event__MdWqvexuSfCbrakeMQx-hg).
2. Send an invitation to your PCO group. Include details about the event and the link to RSVP through your PCO group. Learn how to find the RSVP link [here](https://scribehow.com/shared/Get_RSVP_Link_for_PCO_Group_Event__oV4VZwbrSJ23EdNp5C1tEg).
3. Post about your event/program in the [Foothills Online Facebook group](https://www.facebook.com/groups/foothillsonline). If you don’t personally have Facebook, identify a group member that does who can post on the group’s behalf.
4. Email your church friends and the most active members of your group, inviting them to attend AND invite five of their friends.
5. If your program/event has crossover with other groups, email the leaders of those groups and ask them to invite their group members to attend your event.
6. Send a follow-up email to your group thanking those who have already registered and inviting folks to sign up. Also, include encouragement to personally invite friends to attend.

### Other Tips

- One of the best ways to ensure turnout at events and programs is to continually invite people to join your PCO group throughout the year, even when there are no upcoming special events! Come to church and share about your group with those you meet. Follow up with folks you meet by emailing them the link to join your PCO group.
- Another great way to increase engagement is by teaming up with another group to host an event or program. Talk to other group leaders and brainstorm ways you might work together and events you might co-host.

### The Bottom Line:

<div id="bkmrk-although-it-may-seem">Although it may seem counter-intuitive, our best way to reach the most people is through targeted outreach rather than all-church communications. Many people ignore or delete things in the generic emails but will open and respond to communications they believe are sent just to them.</div><div id="bkmrk-we-also-find-that-mo">We also find that most people show up at something for the first time because they were personally invited by someone else in the church. Even if we fill the emails with everything we are doing in a given week/month, when we ask people how they heard about an event or group, it was from a friend or new acquaintance they met when they came on Sunday. So the job of "marketing" is actually best done by the existing members inviting people they meet - which means helping your group members understand that an important part of their group work on Sundays is to greet people they don't know and invite them to join the PCO group or attend an event with them.</div>

# How To:  Zoom

### 1. Logging Into Zoom (Mac or Windows)

1. Open Zoom:
    
    
    - Launch the Zoom app on your computer.
    - If not installed, go to [zoom.us/download](http://zoom.us/download) and install the Zoom desktop client.
2. Click “Sign In.”
3. Login Method:
    
    
    - Use the email and password provided to you.

---

#### B. On a Web Browser

1. Go to [zoom.us/signin  
      ](http://zoom.us/signin)
2. Enter your Zoom login credentials that were provided by the church.
3. Click “Sign In.”

---

#### C. On a Mobile Device (Phone or Tablet)

1. Install the Zoom app from the App Store (iOS) or Google Play (Android).
2. Open the app and tap “Sign In.”
3. Enter the login details provided by the church.

---

### 2. Starting or Joining a Meeting

- To Join a Scheduled Meeting:  
    Click “Join” and enter the Meeting ID and password (if required), or click the invite link.
- To Start a Scheduled Meeting:  
    Click the “Meetings” tab, find your meeting, and click “Start.”

---

### 3. Recording a Zoom Meeting

⚠️ You must be the host or have been granted recording permission by the host to record.

#### A. On a Computer

1. Once in a meeting, click the “Record” button on the toolbar.
    
    
    - You may see two options:
        
        
        - “Record on this Computer” (saves to your hard drive)
        - “Record to the Cloud” (only available on paid plans)
2. A small indicator will appear, showing that recording has started.
3. To pause or stop:
    
    
    - Click “Pause” or “Stop Recording” at any time.
4. After the Meeting Ends:
    
    
    - If you recorded locally, Zoom will convert the recording and save it automatically.
        
        
        - Default location:  
            Documents &gt; Zoom &gt; \[Meeting Name and Date\]
    - If recorded to the cloud, visit [zoom.us/recording](http://zoom.us/recording) (log in to access).

---

#### B. On a Mobile Device

Cloud recording is required on mobile devices (only available on paid accounts).

1. Tap the “More (⋯)” button in the lower right corner.
2. Tap “Record to the Cloud.”
3. Tap “Stop Recording” from the same menu when finished.
4. Recordings can be found later at zoom.us/recording.

---

### 4. Downloading a Zoom Recording

#### If You Recorded to Your Computer:

1. Open the Zoom desktop app.
2. Click the “Meetings” tab.
3. Click “Recorded” to see local recordings.
4. Click “Open” to view the folder and access your video files.

#### If You Recorded to the Cloud:

1. Go to [zoom.us/recording](http://zoom.us/recording) and sign in.
2. Locate your meeting.
3. Click the “Download” button next to the recording.

# Foothills Website

# Adding Staff Bios to foothillsuu.org

Video: https://drive.google.com/file/d/1IsI5CeJcZybJocVfhgKJjO6yBTR85Sn\_/view?usp=drive\_link

# How to Fill and Light the Chalice

How to safely fill, light, and douse the Worship Chalice in the sanctuary

# How to Fill the Worship Chalice

The Chalice in the Foothills Unitarian Universalist Church Sanctuary is a simple setup that uses high purity isopropyl alcohol (91%) to produce a visible flame. The chalice holds a canister that holds the fuel (the isopropyl alcohol). This canister has a lid that can be used to extinguish the flame in the canister.

#### You will need

- The chalice, fuel canister and lid
- 91% Isopropyl Alcohol
- Lighting wick
- an ignition source (candle or match)
- Fire Extinguisher

#### How to Light the Chalice

- Fill the canister with fuel 
    - There is a notch in the lip of the canister. If filled to the bottom of this notch, the Chalice will stay lit for about 45 minutes.
    - If fuel is spilled, it can be wiped up with a cloth or paper towel.
- Light your ignition source.
- Use the ignition source to light the lighting wick.
- Carefully lower the lit wick towards the fuel in the canister. 
    - The fumes coming off the fuel will light before you touch the liquid fuel.
- Extinguish the lighting wick by sliding it back into its sheath (or blowing it out) 
    - You can also extinguish the ignition source if it is still burning

#### Extinguishing the Chalice

- The chalice will burn itself out after approximately 45 minutes if completely filled. 
    - If you need to extinguish the flame before the canister has run out of fuel, using the wick sheath, carefully place the lid on top of the canister, completely covering the opening. This will deprive the flame of oxygen, and extinguish the flame.

#### Safety and Emergency Precautions

- If the lid for the chalice is not available to extinguish the flame, and the flame is controlled, you can wait for it to burn all the fuel in the canister 
    - Do not leave the flame unattended while you wait.
- If the flame must be extinguished quickly and the lid is not available, you can use a dense cloth like the piano cover to completely cover the flame, or a fire extinguisher.
- Do not touch or move the canister when lit. The lit fuel can spill, spreading the flame.
- If the lit fuel spills or spilled fuel is lit, do not panic. If you are able, find a fire extinguisher or piano cover and extinguish the flame. 
    - If a fire extinguisher or piano cover are not available, call 911
- If you are not comfortable filling, lighting or extinguishing the chalice, do not attempt to do so without assistance. Flameless candles are available in the church as an alternative.