Building / Facility SOP
- Fort Collins Building Energy and Water Scoring (BEWS)
- Parking Spaces / Parking Lots
- Elevator Maintenance
- Dashlane User Guide
- East Main Entrance Automatic Door Lock
- Lawn Sprinkler System
- Security: Panic Buttons and Cameras
- Emergency Shutoff Diagram
- Laundry Services
Fort Collins Building Energy and Water Scoring (BEWS)
Building Energy and Water Scoring (BEWS) Program Overview & Reporting Instructions
The City of Fort Collins requires annual reporting of building energy and water usage through the Building Energy and Water Scoring (BEWS) program. Currently, only energy reporting is mandatory; water reporting is not required at this time.
Each spring, the City initiates the annual reporting cycle by submitting a request through the ENERGY STAR® Portfolio Manager®. This is followed by an email notification indicating that the report is due by June 1.
We’ve already set up our account so that both the City and Xcel Energy automatically import data into our instance of the Portfolio Manager. Below is a summary of the process and detailed steps to complete the report.
Steps to Submit the Report to the City
1. Log into Portfolio Manager
Access ENERGY STAR Portfolio Manager® account using the credentials stored in Dashlane.
2. Confirm Building Information
Ensure all required building information is accurate and complete for the previous calendar year.
You can verify and update this information under the Details tab. This was last adjusted following the completion of the Sanctuary and basement in 2023.
3. Verify Utility Data
To confirm that utility data has been imported:
-
Click on Foothills Unitarian Church in Portfolio Manager.
-
Go to the Energy tab to see charts displaying the latest billing data. Ensure that everything for the previous year has been completed.
- Click on the meters and errors in reports will be listed at the top of the page. If there are errors, steps to fix them should be listed. Proceed once all the errors have been addressed.
4. Submit Your Report
Ensure that your electric and gas meter data covers January 1 – December 31.
Steps to submit:
If the dropdown is greyed out, refresh the page and try again.
5. Confirmation and Follow-Up
Once submitted, you should receive an email within 24 hours from the BEWS Help Center with one of the following statuses:
-
Pending Revisions (additional information required)
-
In Compliance (submission accepted)
Your report is not considered complete until you receive an “In Compliance” confirmation. You can check your building's status on the Fort Collins Benchmarking Map.
Resources & Support
-
Program website: fcgov.com/BEWS
-
Help Center: BuildingScoring@fcgov.com | (970) 416-2733
Parking Spaces / Parking Lots
| Parking Lot | Handicap Spots | Non-Handicapped Spots |
|
East |
3 | 47 |
|
West |
2 | 47 |
|
Yorktown |
Elevator Maintenance


- The first is an annual inspection. This is completed by the state of Colorado Conveyance Section and the contractor. A passing inspection will produce the Conveyance Annual Certificate of Operation. This is normally completed in October or November.
- The second inspection is a 5 year maintenance inspection. This is completed by a 3rd party elevator group such as Morning Star.
- We must also do a monthly test to verify that communications are working properly. This is outlined below. It is also printed and left in the mechanical room.
Elevator Monthly Communication Test
All the items you will need can be found in the Elevator Mechanical Room which is in the Men’s restroom in the CW basement. The keys to the room are located in the lockbox in the Admin office.
- Barrel Keys to test locking doors
- Notebook to keep track of results

Steps to the test:
1. Press the call button in the elevator. Someone will answer over the speaker.

2. Let them know all is well and that you are conducting a monthly test of the elevator communications.
3. Ask them to tell you your location.
4. Can you see my video? If the video is working you will see call connected on the video screen. They will see you but you will not see them.

5. Can you see my response on the Yes and No buttons when I press them?

6. You are all done and can end the call now.
7. Testing the fire setting for the door using the panel outside the elevator on the main floor.
-
-
Make sure the doors are open.
-
Put the barrel key in the slot and turn it to ON. The light on the helmet will turn red.
-
Turn left to RESET and then turn it to OFF.
-

8. Fill out the form in the notebook with the results and your initials.
If there are any issues found contact the maintenance company for guidance.
Dashlane User Guide
Overview
This guide provides step-by-step instructions for using Dashlane within our organization. It covers logging in, enabling recovery options, saving passwords, sharing access securely, creating groups, adding secure notes, account recovery procedures, and using VPN.
1. Logging Into Dashlane
Step 1 — Open Dashlane
Go to: https://app.dashlane.com
(You may also use the Dashlane browser extension if installed.)
Step 2 — Enter Your Email
Enter your work email address and select Next.
Step 3 — Enter Your Master Password
Type your Master Password and select Log In.
Important:
-
Your Master Password protects your encrypted vault.
-
Administrators cannot see your Master Password.
-
Never share your Master Password with anyone.
Step 4 — Complete Verification (If Prompted)
You may be asked for:
-
Two-factor authentication (2FA)
-
Email verification
-
Device approval
2. Activate Admin-Assisted Recovery (Critical Step)
This step prevents permanent lockouts and must be completed by each user after logging in.
User Setup Steps
-
Open the Dashlane web app or browser extension.
-
Go to My Account or Settings.
-
Select Security Settings.
-
Locate Account recovery.
-
Click View options
-
Enable Admin-assisted recovery.
You may be asked to:
-
Confirm your Master Password
-
Confirm your email address
3. Saving Passwords
Dashlane can save passwords automatically or manually.
Automatic Saving (Recommended)
-
Log into a website normally.
-
Dashlane will prompt to save the password.
-
Select Save.
Manual Entry
-
Open Dashlane.
-
Select Passwords.
-
Choose Add New.
-
Enter:
-
Website name
-
URL
-
Username
-
Password
-
-
Select Save.
4. Sharing Passwords Securely
Passwords can be shared with coworkers without exposing credentials unnecessarily.
Step 1 — Select Password
Step 2 — Share
Step 3 — Choose Permission Level
Limited Rights (Recommended)
-
Can use login credentials
-
Cannot view, edit, or re-share the password
Full Rights
-
Can view password
-
Can edit
-
Can re-share
Step 4 — Send Share
5. Creating Groups for Password Sharing (Business Feature)
Groups allow sharing access with multiple users at once.
Step 1 — Open Sharing Center
Open Sharing Center within Dashlane.
Step 2 — Create Group
-
Select Create Group.
-
Enter a group name (example: Office Staff, AV Team).
Step 3 — Add Members
Add user email addresses and assign permissions if prompted.
Step 4 — Share with Group
-
Open a password item.
-
Select Share.
-
Choose the group instead of individual users.
Benefits:
-
Easier onboarding and offboarding
-
Centralized access management
-
Reduced administrative effort
6. Adding Secure Notes
Secure Notes store sensitive information in encrypted form.
Examples:
-
Alarm codes
-
WiFi details
-
Vendor contacts
-
Internal procedures
Step 1 — Create Secure Note
Step 2 — Enter Information
Add a title and content. File attachments are optional.
Step 3 — Save
Select Save.
Step 4 — Share Secure Notes (Optional)
-
Open the secure note.
-
Select Share.
-
Choose users or groups.
7. Account Recovery if Password Is Forgotten and Recovery Was Not Enabled
If recovery options were not enabled, the encrypted vault cannot be recovered. The account must be reset. Please let the Dashlane Admin know when you start this process.
Current Admin: Holly and Katie
Step 1 — Initiate Account Reset
-
Enter your email and select Next.
-
Select Forgot your Master Password.
-
Choose Reset Account.
-
If you do not have the browser extension installed it will have you install it.
-
Follow instructions to reset your account.
Step 2 — Create New Account
After reset:
-
Create a new account using the same email address as before.
-
The vault will be empty.
-
Credentials must be re-added manually.
Step 3 — Admin Removes and Reinvites User (Optional)
If issues occur:
-
Admin removes the user from the Dashlane Business Admin Console.
-
Admin reinvites the user to the organization.
8. Using the Dashlane VPN (Powered by Hotspot Shield)
Dashlane Business includes a Virtual Private Network (VPN) powered by Hotspot Shield. This VPN encrypts your internet connection to help protect sensitive information, especially when using public or unsecured WiFi networks.
The VPN service is provided through Hotspot Shield but is accessed through your Dashlane account.
When to Use the VPN
Use the Dashlane VPN when:
-
Working on public WiFi (airports, hotels, coffee shops)
-
Traveling
-
Accessing sensitive organizational systems remotely
The VPN is typically not required when working on a secured office network.
How to Set Up the VPN (First-Time Use)
Step 1 — Open Dashlane
-
Open the Dashlane web app or browser extension.
-
Navigate to the VPN section.
Step 2 — Activate VPN Access
-
Select Enable VPN or Get Started.
-
Dashlane will prompt you to activate your VPN subscription.
-
Follow the prompts to create or link your Hotspot Shield account (this is required for VPN access).
Step 3 — Download the Hotspot Shield App The VPN runs through the Hotspot Shield application.
-
Download the Hotspot Shield app for your device (Windows, macOS, iOS, or Android) when prompted.
-
Install the application.
-
Log in using the credentials created during activation.
Step 4 — Grant Device Permissions Your device may ask you to:
-
Allow VPN configuration
-
Approve network permissions
Approve these to complete setup.
How to Connect to the VPN
-
Open the Hotspot Shield application.
-
Select Connect.
-
Wait for confirmation that the VPN is active.
When connected, your internet traffic is encrypted.
How to Disconnect
-
Open the Hotspot Shield application.
-
Select Disconnect.
Important Notes
-
The VPN protects internet traffic but does not replace strong passwords or two-factor authentication.
-
Internet speed may vary while connected.
-
If you experience connectivity issues, disconnect and reconnect.
-
The VPN is intended for business security use and should not be used to bypass organizational policies.
Best Practices
-
Use Limited Rights sharing unless full access is required.
-
Store shared organizational information in Secure Notes rather than email.
-
Use groups instead of individual sharing whenever possible.
-
Enable Admin-Assisted Recovery immediately after setup.
-
Create and store an Account Recovery Key securely.
-
Never share your Master Password.
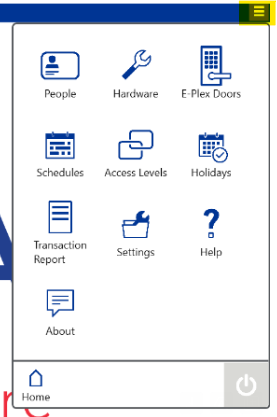
East Main Entrance Automatic Door Lock
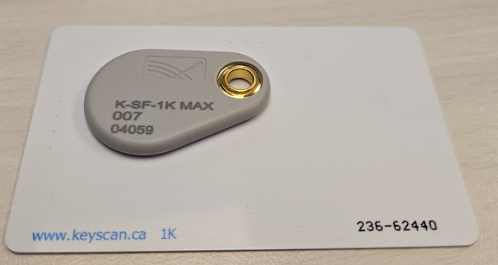
In this example picture the Batch number for the fob is 007 and for the card is 236. The credential numbers are 04059 and 62440.
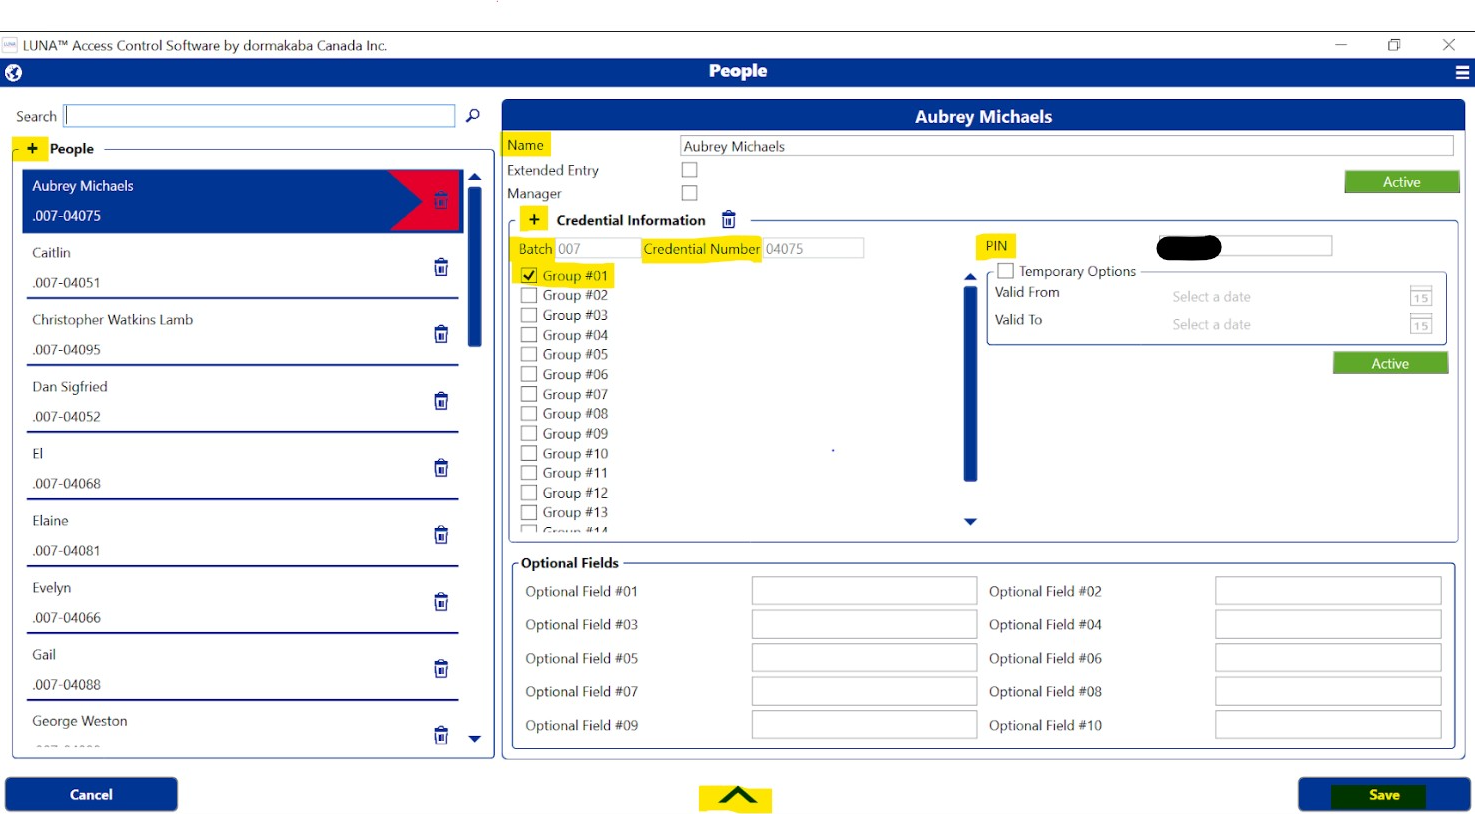
- Select People
- Click the + in the top left next to the word People.
- Enter the Name of the person.
- Click the Plus next to Credential Information
- Select Keyscan from the drop down
- Enter a Batch Number.
- Enter a credential number.
- Enter a 5 digit PIN number. I ask if they have one that they will remember, if not I leave what is already entered.
- Select Group #01. This will point them to our door.
- Select Save
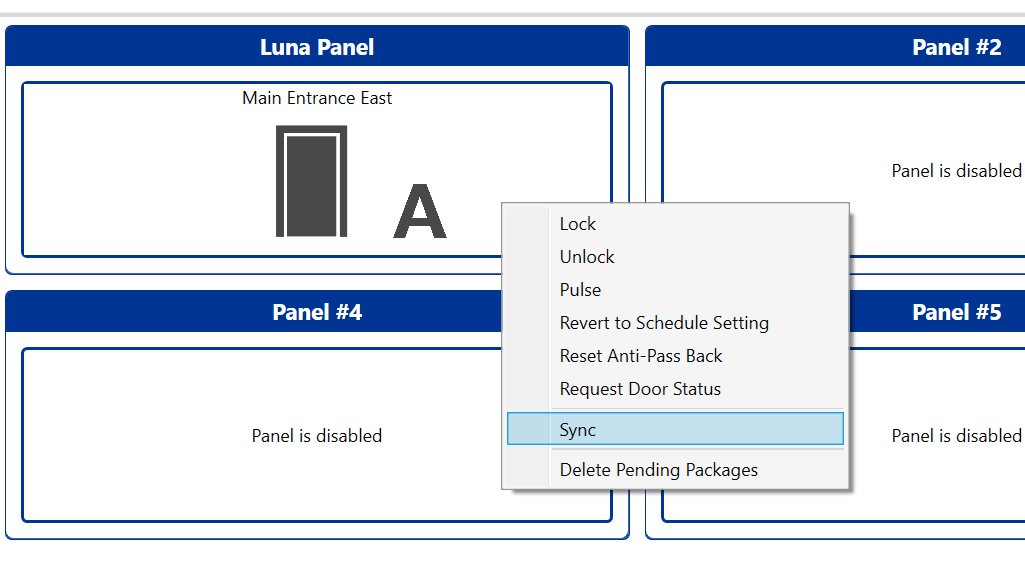
- Click on the up arrow, , in the bottom middle.
- Right Click on the Luna Panel labeled Main Entrance East.
- Select sync.
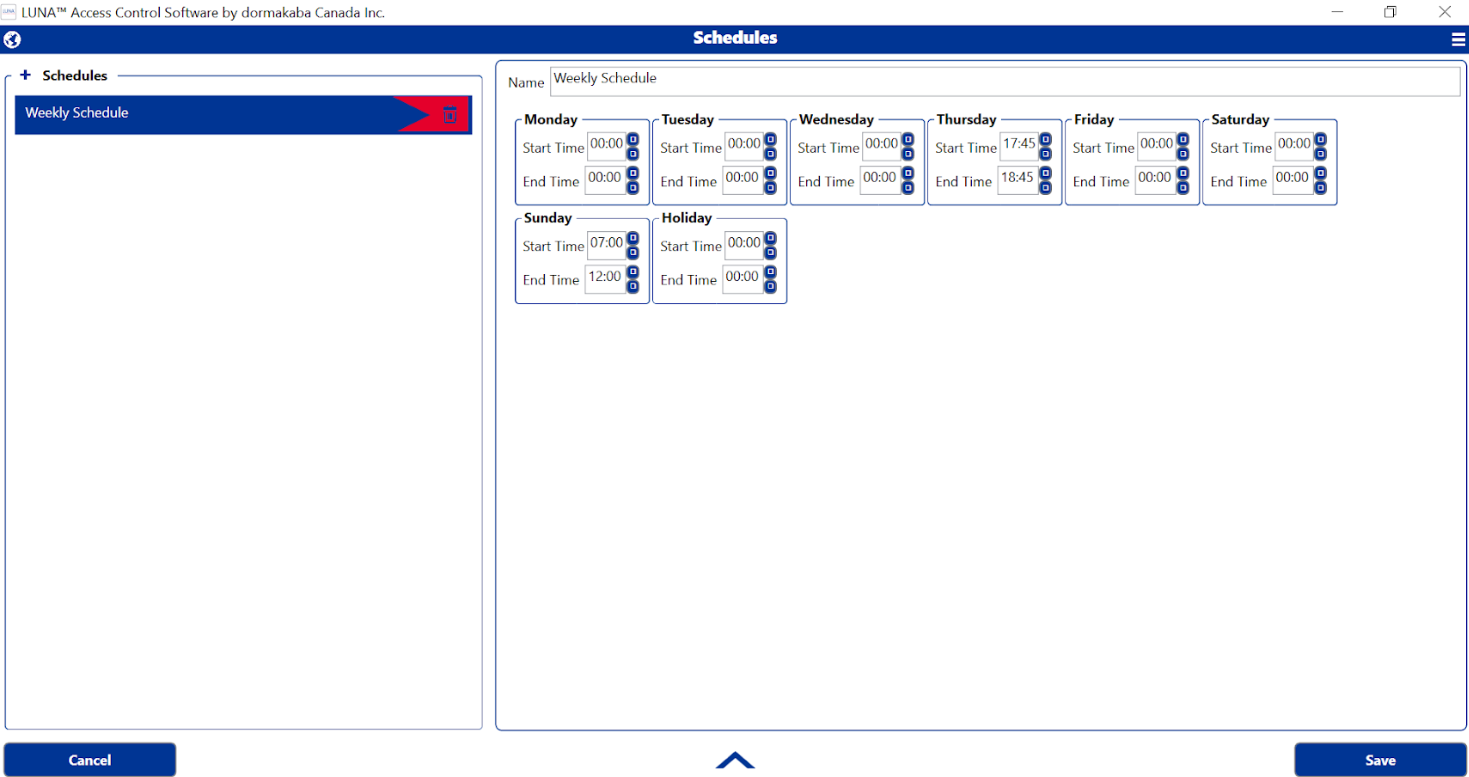
- Select Schedules
- Make the desired changes to the weekly schedule. The time is based on the 24 hour clock. There can only be a single entry per day.
- Select Save
- Click on the up arrow in the bottom middle.
- Right Click on the Luna Panel labeled Main Entrance East.
- Select sync.
- Click on the up arrow in the bottom middle of the screen.
- Right Click on the Luna Panel labeled Main Entrance East.
- Select Unlock
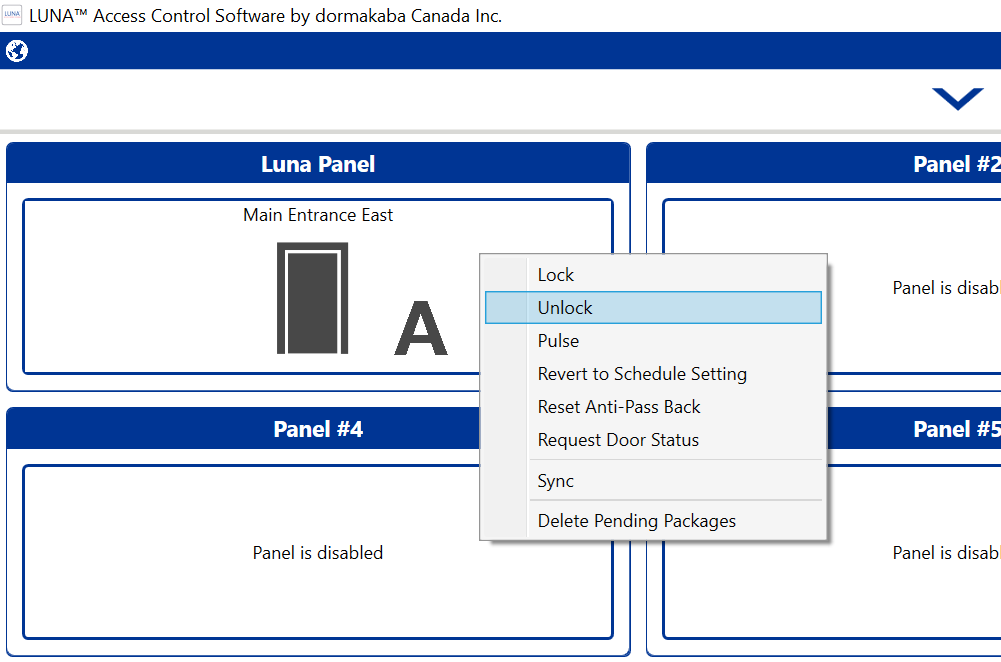
- Click on the up arrow in the bottom middle of the screen.
- Right Click on the Luna Panel labeled Main Entrance East.
- Select Lock
Lawn Sprinkler System
Hurr Vasa
(970) 613--0225
irrigationmanager@hurrvasa.com
https://www.hurrcolorado.com/

- Press the top black button to the right of the Stop sign.
- Press the bottom black button next to System Off.


Security: Panic Buttons and Cameras
In the case of emergency press the button 2 times. This will contact the monitoring company and they will contact us via the tablet on the Admin Lobby Desk, if no answer call the 3 contacts, Holly, Jenn or Katie. They will call the police unless Katie, Jenn or Holly tell them not to.
Admin passwords and codes are in Dashlane.
We pay Rocky Mountain Installs in January for annual monitoring.
Camera System:
1 NVR: 192.168.100.186
Camera 1: 192.168.11.6 Exterior Patio
Camera 2: 192.168.11.5 Exterior West Main Entrance
Camera 3: 192.168.11.7 Interior Commons East Doors
Camera 4: 192.168.11.8 Interior Commons West Doors
Camera 5: 192.168.11.9 Interior Admin Lobby
Camera 6: 192.168.11.11 Interior Unity Stage
Camera 7: 192.168.11.13 Interior Unity Back
Camera 8: 192.168.11.12 Interior Family Ministry Lounge
Camera 9: 192.168.11.14 Exterior East Walkway and Parking Lot
Camera 10: 192.168.11.16 Interior Sanctuary Back
Camera 11: 192.168.11.15 Interior Sanctuary Side
Camera 12: 192.168.1.82 Interior Basement Drake Doors
Mobile App Connection:
Download and install the Clarevision App.
To add the NVR to the mobile app:
-
Open the ClareVision app on your mobile device.
-
Follow the on screen directions to get to the add device option.
-
Select "Device is on a remote network".
-
Select to either use the UID or the QR code.
-
-
UID:LX7Y2CE374291UYN111A
-
The password is stored in Dashlane
-
Device Name: Clare
-
-
Click Next once it says the device has been successfully added.
-
All the cameras will display live views on the next screen. You must select all the cameras to have a view of them.
-
Click done. You will then be able to scroll though all the cameras and select the one you want to focus on.

To look at a historical view of a camera:
-
Open the ClareVision app on your mobile device.
-
Scroll until you find the camera you want to view.
-
Select Event History and then the filter button (looks like a funnel) to enter the date you want to look into:
-
-
Click Apply.
-
A view of the camera and a list of Motion Detected Times will appear. Just scroll through them until you find the time you want to see.
-
There is a lot of data so have patience.

Emergency Shutoff Diagram
This is a diagram of all the Emergency Shutoff Valves as pointed out with the sanctuary build.
Laundry Services
Laundry Services Guide
How to manage weekly laundry, event laundry, and professional laundry services — for volunteers and staff.
Step-by-Step Instructions
Step 1: Weekly Laundry — Volunteer Rotation
Two volunteers cover laundry on an alternating weekly schedule, so laundry is picked up every week.
• Volunteer A comes in on odd weeks; Volunteer B comes in on even weeks.
• Each volunteer handles collection, washing, drying, and return of that week's laundry.
• To reach the volunteers, contact the Laundry Support group in Planning Center Online (PCO).
Step 2: Event Laundry — Potluck or Small Events
For events such as potlucks, a participant typically volunteers to take the laundry home.
• At the end of the event, ask for a volunteer to take the laundry.
• Bag the dirty items in garbage bags and hand them to the volunteer.
• Confirm a return date for the clean laundry before they leave.
Step 3: Large Event Laundry — Hiring Suds R Us
For large events with a high volume of laundry, contact Christine at Suds R Us. (Note: Contact Christine until Drew returns.)
• Send an email to Christine at ctina579@gmail.com letting her know laundry is ready.
• In the email, work out a pickup time and a drop-off time.
• Bag the dirty laundry in garbage bags.
• Place the bags in the admin lobby for pickup.
• Christine will notify you when the laundry is clean and ready to return.
• Pay Christine when she brings the laundry back — typically by credit card, or petty cash if needed.